Converting html or pdf to a Booklet

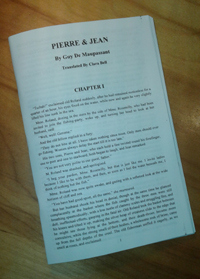
Pierre and Jean (91 pp.)
Sometimes it's nice to have a printed booklet of a web page or pdf file — half letter-size (5½ x 8½), about the size of many printed books. There will be a limit on the number of pages short of book-binding (!). The image here shows Maupassant's Pierre and Jean at 91 pages, that's about the upper limit. This story takes 23 sheets, considering that four pages are printed on each sheet; folding and stapling more sheets than that becomes difficult. I'll walk through the steps from web page to booklet. The requirements to do this are as follows:
2) Space on a server and an FTP program.
3) Chrome or another browser that converts a web page to a pdf file.
4) Adobe Acrobat Pro.
5) A printer allowing you to print in booklet mode.
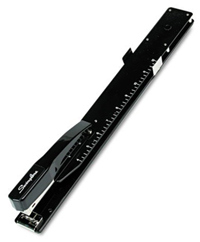
6) A "long-boy" stapler to place a staple 6" in from the edge.
The first step is to locate or produce the html and massage it. So find a text or hml file on the Internet that you want to turn into a booklet. Either way, you can download the file in Chrome. When the file is showing in the browser, right-click it anywhere in the main window of the browser, then choose Save as ... in the context menu that comes up. That will show a dialog for you to specify the name and location for the file when it's downloaded to your local machine. An html file may have an associated external css file attached to it — check the header to see if that is the case, and if so, figure out it's URL and download that too.
If starting with a text file, embed it in a basic compliant html document, introducing div or p elements to make paragraphs. Use header elements (h1, h2, etc.) or style to enlarge the title or subtitles as desired. Enlarge the entire document like this (the exact expansion factor will vary depending on how big you want the text):
<body style="font-size:130%";>
You can style the body as desired to make global settings — like this, for example:
<body style="margin:5%; text-align:justify; font-size:130%; font-family:Arial">
All the better if the downloaded file is already html; you can add styles to the body as just suggested and massage it in other ways. Extraneous material can be removed, for example. Or there might be a background color, which will involve you in printing a lot of color needlessly if that setting is not removed. Next upload the massaged html file and css file (if any) to a server somewhere — Chrome's html-to-pdf converter seems to require that the file be on a remote server.
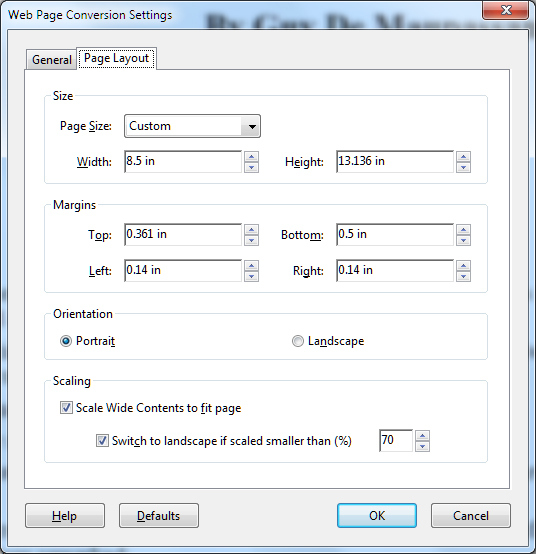
Once the prepared html file is on the server, hit it in Chrome. You should notice a little Adobe Acrobat icon in the upper right hand corner — left-click it to bring down a menu. Click Preferences ... on the menu and in the dialog, click the Page Layout tab:

Minimize the browser if necessary to find the dialog, which sometimes slips behind it. The settings shown are reasonable ones. One problem that arises is the aspect ratio, which is different for half sheets than for whole sheets. The aspect ratio for half sheets is \( 8.5 / 5.5. \) All the same, we want the width to be \( 8.5^{\prime\prime} \) so the file looks reasonable in Acrobat, which leads to this equation, where \( y \) is height of the pages in the pdf file to produce:
\[ {y \over 8.5} = {8.5 \over 5.5}. \]
Solving leads to \( y = 13.136^{\prime\prime}, \) the value shown above in the dialog for page height. After putting in the settings, click OK.
Then click on the Adobe Acrobat icon again and click Convert webpage to PDF .... After a moment, a Save As dialog will show. Set the name and location as desired (where you want the file on your local machine), then click Save.
Open the pdf file in Acrobat Pro. The next step is to adjust the header and footer as desired. I prefer to have neither, except for page numbers at the bottom of each page. To do this, choose Tools / Edit PDF, then click Header & Footer from the third menu strip along the top. Click Add from the context menu, then Replace Existing in the dialog. In the Add Header and Footer dialog that comes up, choose the font for the page numbers towards the top (Name and Size). About a third of the way down the dialog, click the text field under Center Footer Text so a blinking cursor appears there. Then click the Insert Page Number button just below the text box, causing the <<1>>File / Save.
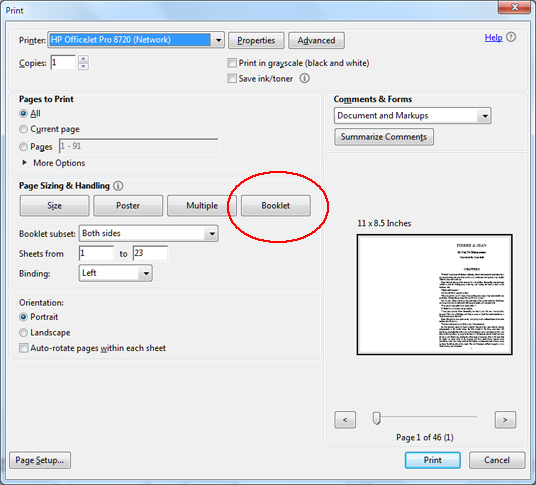
Now the pdf file is ready to be printed. The main thing here is to have a printer that prints in booklet mode. With the file in Acrobat, choose File / Print. Here is the print dialog that comes up for my HP OfficeJet Pro 8725:

Note the Booklet option, circled in red (click that button!). There are \( 91 \) half-sheet pages in this document and since four of these pages are printed on a single sheet of paper (front and back), \( 91 / 4 = 23 \) physical sheets will be printed, rounding up. I recommend an experimental print run with just four pages (one single sheet with half-sheets front and back). For a test-run like this, replace the \( 1 - 91 \) with \( 1 - 4 \) towards the top left under Pages to Print. After making all desired settings, click the Print button at the lower right of the dialog. Keep the pages in order, they will come out ready to compile into a booklet.
Note the thumbnail of the print job in the dialog above only shows one half-sheet on the right of the page. That's because in a \( 91 \) page print job, the last page will be blank. When folded, the first page and last page will be on the same side of one physical sheet, as shown. For a four-page print job, both left and right will be filled in, because then the last page will be the fourth, and that last page has printing.

Stack the pages as they come out of the printer, then fold them all. Folding four pages at a time is reasonable, just keep them in order and recompile them all after being folded. Next place three staples along the fold with a long-boy stapler. I got one from Amazon, a Swingline Heavy-Duty Stapler, 12-Inch Reach, 20-Sheet, although I did 23 sheets of \( 20\# \) paper for this project, no sweat. It might be advisable to practice stapling to make sure the staples line up perfectly along the fold, there is a bit of art to that.
Voilà, your pretty booklet is done, ready to be read in your easy chair like a civilized person would do.
Mike Bertrand
August 17, 2018